Showing posts with label pastals. Show all posts

Jun 29, 2013

Paul Klee artwork with Stancil and Color Tissue Paper

 
Today is the anniversary of Paul Klee's death.
 
His great quote: "Drawing is like taking a line for a walk."


I made cardboard stancil to drew Curve LINES as waves for the grid on the background


The bright color tree is color tissue paper glued on black pastal line drawing on prcut cardboard shapes.


This is inspired by Paul Klee art
The Waters of March

lisen to Art Garfunkel - Waters of March 
this is reposting,
this is one of my favorite project, adult students w/Autism of all levels
for details check back Trip to Eilat insired by Paul Klee ,


Jun 21, 2012

Picasso- recycle postcard


Using a Picasso  postcard booklet that was fallng apart .

They choose the postcard they liked.

I helped them match colors to work with.


16 years girl 


2nd grade


above N, 10 years old  loves horses. I was pleased to find this Picasso postcard and N did this lovely artwork. 

above E, 7 Year PDD student,  she is very enthusiastic
 

Dec 29, 2011

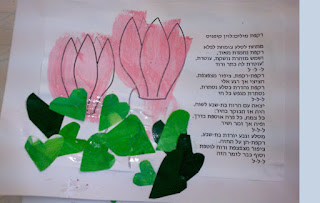
Winter, The Cyclaman Plant

My favorite wild  flower is the Cyclaman, that blooms in the beginning of the winter.The flower has lovely shape leaves, shaped like a heart and  each leaf is  beautifuly  designed with a mix of greens.
So with some of my high students we used stancil to make leaves and with the rest I cut heart shape leaves out of the paper the students painted in green a week before.
We work on color, mixing white and red for pink.


Dec 22, 2011

Broken line texture, Channuka Oil Jar

 The first step they did is brush  cooking oil
on the precut color cardboard jug (same as  "Oil Jug, Pastels with oil")
 Next, they wrinked the jar shape color paper to a small
round ball to form the broken line texture you see on  the jar.
Open thr wrinkled jar and glue it on heavy board,
Drew with oil pastels around the jar to form a border design.

Last, paint with gold guache on top, the gold paint goes deep in side the wrinkles paper and lighter where there is pastel and brushed cooking oil.

Feb 25, 2011

Personal Map Collage

Inspired by Orly Avineri Blog, a beautiful one-artist journal I go back to the first post "personal map" collage.


Orly Avineri  write in her blog 
"I am a creator of intimate maps, just like you, we are all creators of boundless paths, treading continually, laying down tracks for moving forward."


Feb 7, 2011

Winter Flower, Cyclaman plant

Another sign of winter is the cyclaman plant growing between the rocks, last year I all so posted a project using a heart shape stancil.
Using old notebook covers that I saved to use as a base for a future art project I cut heart shape stancils.
With that they drew with oil pastels the leaves of the cyclaman plant my favored winter flower. And waterdown guache was used for background.
The flowers was made on a trasparence sheet; using plasticine on the line drawing; in the same technique as the winter snail.

Sep 15, 2010

Hanging Holiday Picture

This photo is the back and front of a hanging holiday art project.
After choosing 2 illustrations to decorate; they glued it on a A3 bristol paper.
While the glue dryed they embossed the aluminium sheet for hanging.
Around the illustrations I added lines as can be seen in the photo, as a starting point to design the decoration. They continued the line to create a pattern to color; each making an original design.  
The A3 bristol is folded in 2, and put together with a staple to the alluminum hanger.
We used wooden sticks that were cut from a decrative fance that was about to be thrown away. 
They should be hang in the middle so that both sides can be seen.

Sep 2, 2010

Printmaking for the Jewish NewYear


This year I want work on prints, and our first project is this Jewish New Year Greetings.

The first thing they did is create the heart print design; they glued precut cardboard hearts I prepared.
While the hearts dryed they designed the Chamsha (in the middle) with pastals, using a stancil of the eye to start the design.


Then they started printing on transparent paper.
The round print is done on coins to wish aboundance; next to that there are smiley stickers to wishing happiness.

Now I see that printmaking is not easy; it is importent to supervise.
I need to the importance of printing more then one time to acheive a clear print.

Aug 23, 2010

Art Project for the Jewish New Year

Aluminum sheets are always great for a holiday.
Mix media, 2 layered holiday greeting held together with a pink ribbon.

They used cardboard stancil of a fish and colored the background with pastels, fish being a symbol of the holiday.
With a drop of oil, using cotton ball they rubbed on and around the color, making the colors a deeper and brighter .
Added a line drawing in dark pastel for details, as outline, holiday symbols and text.

While the oil evaporated they received a piece of aluminume foil.
They choose either a pomegrant or chamsha stencil to draw on the aluminum foil. Used a pencil they embossed a design.
The shape was than cut, put together with the ribbon and at the end they added holiday greeting.

See another Jewish NewYear Artprojects: Jewish New Year project and printmaking .

Jun 13, 2010

complementary Colors - Blue and Orange


To continue with the Color Wheel this artproject is with the complementry colors blue and orange. Last week we did red and green
Step 1: creat a 3D fish, I gave out a photocopy drawing of fish. After creating round paper balls from newspaper they glued the round balls inside the line of fish. Then they glued a top layer of paper, pressing to form shape of fish.
We let it dry while they created the background.


Step 2: The Background is made with a precut stencil of a fish made of cardboard. They drew with color orange red and yellow using oil pastel and the fish stencil to create a background full of fish.
Using blue guache mixed with water they painted the water.

Step 3: I pre-painted magazin paper with the color orange and cut them to strips to be glued on the 3D fish.
Once I cut around the fish shape they glued the strips on the fish and added eyes with the blue pastal color.

Jan 13, 2010

The Cyclaman Plant


Another sign of winter, the cyclaman plant blooming between to rocks, they are very beautiful.
A three step art project that came out beautiful to everyone in all my groups.


Step 1: Mix the color red and white to get pink. Paint photocopy illustration of 3 flowers. We pasted the copypaper on cardboard to make it thicker and let it dry.

Step 2: Leaves design, using precut heart shape stancil and color pastels they drew leaves on color cardboard,(size A4 which I riped a quarter from the top to give it have a natural look and that at the end it will fit on a A4 size board). They moved the stencil and colored the leave filling the whole paper using diffrent shades of greens or mixing green with out colors.
I pointed out the leave design, some drew with color and some used a sharp tool to engrave the design.

Step 3: Using precut box cardboard they glued a design that gives an impression of a rock or gardenpot.

My high level students cut the pink flower by themselves and for the rest I cut out the flowers that were painted pink.
They glued the 3 parts of the project together.

Dec 17, 2009

Oil Jug, Pastels with oil,


The first step they did is to brush with cooking oil on the precut cardboard jug.
Then they the colored with oil pastels which gave a wonderful bright and soft effect.In addition rubbing the color with a finger mixes the colors well. Most of the members enjoyed the feeling of the oil.

While the oil jug was drying they colored the background, using a black color cardboard with pastels.
And then with a sharp tools some members scratched the color pastels to form a design.
Those beatiful oil jugs were done by my lower level group.