Showing posts with label plasticine pattern. Show all posts

Apr 22, 2014

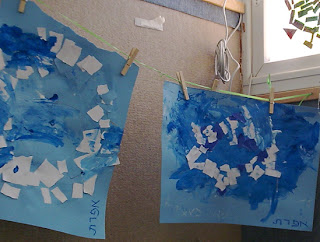
Only Blue &White

 
Blue and White
 all around to celebrate Israel Independent Day
plasticine line design on clear sheet , tracing line drawings
on cardboard painted blue.
 border design with white pastel
autistic adults art project


special education 2nd grade


* REUSE prepainted acrilic paint on magazine pages, great base to draw with pastels


autistic adults art project


Apr 17, 2012

Collage - Personal Map


Spring a perfect time to hike around and see nature,  with reuse maps my disable teen students made their personal map.

 This artproject is based on my first post in this blog!! Jul 25,2009
posted again
This time the drew the line with color pencils, added paint on top of the pastels and the plasticine detail.


Mar 9, 2012

Citrus Fruit- Circle Stancil

The season for the Citrus fruits is during the winter, so a couple of weeks ago all my classes did the artwork "citrus fruit", a great art lesson  the shape circle and mixing red and yellow to form orange.

For the upper grades they worked on a precut cardboard circle, they drew a circle using the stencil and glued a photocopy of a citrus fruit in the middle.


They formed roundshape balls from plasticine and pressed them on the linedrawing of the circle.

They colored the citrus fruit with the orange they mixed using red and yellow.


The 2nd grade students artproject was to extend the photo copy of the citrues fruit.
They used the stancil to drew more circular shape fruits.
Then they mixed red and yellow to create orange and painted the drewing.

Precut green leaves were added.


Nov 28, 2011

Plasticine Frame

A week after we made the ",circle with plasticine" we made this colorful mix media collage.

Each student choose a photo.

1. frame around the photo with plasticine,  using round shape balls technique.
 
2. tear strip of color paper and create a collage around the frame.
 
3. add a layer of glue on top of the plasticine frame.


Nov 16, 2011

Shapes, Circle with Plasticine


Keeping with my objective this year of teaching "Shapes", my teen age special ed. classes created those colorful artworks 


  1. First thing create many round shape balls from plasticine.
  2. Using  precut cardboard stancil  they drew the circle
  3. Paint outside and inside the circle in 2 different colors.
 My after thought, it can be a good way to work on the COLOR WHEEL- using Primary Colors paints and  Secondary Colors plasticine.

May 16, 2011

Plasticine Tablet- Chamsa


The Chamsa (Arabic) a lucky talisman shaped like a hand is done as a plasticine tablet on a collage using recycle wrapping paper.

Step 1. Work on a precut card board shape of a Chamsa,
 glue a line drawing of an object, and then cover the drawing with colored plasticine.
work around the object to cover the cardboad shape.
Use sharp tools to embossed pattern on the plasticine
Brush layer of glue on the shape.
Step 2.  While the Chamhsa shape dry creat a wrapping paper collage.
Step 3. Glue cardboard shape on the collage and decorate.

Feb 7, 2011

Winter Flower, Cyclaman plant

Another sign of winter is the cyclaman plant growing between the rocks, last year I all so posted a project using a heart shape stancil.
Using old notebook covers that I saved to use as a base for a future art project I cut heart shape stancils.
With that they drew with oil pastels the leaves of the cyclaman plant my favored winter flower. And waterdown guache was used for background.
The flowers was made on a trasparence sheet; using plasticine on the line drawing; in the same technique as the winter snail.

Dec 20, 2010

Snail, Winter Collage,

After the rain the snails come out and we had a big rainstorm last week.

  • For the background a collage with self torn tissue paper and trasparent paper  mixed with precut aluminium paper . Winter colors on black and .
  • While the collage dryed they designed there snail on trasparence sheet; using plasticine on the line drawing.
  • Then glued the trabsparent slide on the winter background and add a layer of glue on the plasticine.


Both stages of the project are very productive, and no matter what level they look good.
This technic was used in blue and white artproject,

Jul 13, 2010

Window Color Artproject, mix media


We made this window art on a trasparence sheet; using plasticine to out line the drawing and torn color crepe paper and color sand to fill in the drawing.
Above both sides of the trasparence sheet.


They choose between a fish or a parrot.
One group did the torn paper inside the drawing and sprinkeled color sand all around the animal.
My second group started with the backround, using torn color paper to do the background and the inside was done with color sand.
I hope to display on the windows, and will post in the blog.

Apr 7, 2010

Blue and White


Inspired by the colors of our flag we made this artproject for Independence Day that is coming up.
Step1: They mixed navy blue with white and make their own blue, to paint the board as background.
Step2: Before choosing a line drawing they created shapes from the plasticine,one group created snakes and the second group made round shape balls(different levels). They choose from 4 drawings: our map, palm tree,airplane or sunny beach.
Step3:We attached a transparent slide on the line drawing and they created the illustration by pressing the plasticine on the slide.
Step4: Glued the slide on the blue background, add a layer of glue on the plasticine.
Step5: Draw a frame design on the blue board around the slide.

Jan 11, 2010

The Almond Tree


In the winter the almond tree blossoms with beautiful white flowers.

Step 1: glue photocopy of the almond tree.
Using black pastel they drew over the branches in the photo and continue them through out the board.
Step 2: Then they painted in between the lines of the tree.

Step 3: on a cardboard I helped draw the shape of the flower of the almond tree.
Step 4: they fill the shape with plasticine to make a stamp for print.
Step 5: print the flower with white paint all over the tree.

Nov 2, 2009

Mix Media, Squill Flower

When the Squill Plant "Chazav" blossom it is a sign of the begining of Fall .
Step A: On a printed pattern they placed round plasticine balls to create the press pattern.
Step B: They placed white paper on the plasticine pattern, they pressed and rubbed with oil pastels to create the flower pattern in different colors.
Step C: Glue the plant pattern on cardboard and let it dry.


Step 4: They drew the background with pastels, on the bottom a ground and at the top the sky so that the squill plant reach the sky.
Step 5 : I help cut out around the flower that were in different colors, they glued the flower and added the long stem to each to form the plant.

Oct 10, 2009

Red Strawberry Stamp Picture


After a black and white project the art project was the color red.
On the table was only red objects.
Part A: preparing the stamp, we using a clear plastic cover to prepare the stamp.
A line drawing of a strawberry was put under the clear cover.
They put a layer of clay in the inside of the strawberry and with a wooden stick the poked little holes in the clay to creat the texture.
Part B: printing using the clay stamp, using red gauche they created the composition.
Part C: wait a little to dry; then add small details with red marker or red pastal.
And finialy at the end, green color was added as leaves.
The strawberries were good to eat.