Showing posts with label torn paper. Show all posts

Apr 11, 2012

Family Day Artproject with Recycle Wrapping Paper

This was done with my lower level disable teen class for family day.

I precut shaped house and heart from recycled packaging brown corrugated cardboard  I found.

They ripped recycled wrapping paper that were precut to strips to decorate the house shape.

With our help they mixed red and white to make a special pink to paint the heart.


see great school artwork

Mar 2, 2012

Art for the Purim Carnival

This is my #100 post, wow! 
...art for the Purim Carnival is perfect.
Pirates Hat, tomorrow we have a treasure hunt.
Below, eye mask with  personal  hand print. 

Print mask, colorful and bright.

Zebra mask done like the double sided mask , we worked on one side but it would be great to make another animal on the other side.
 A Purim clown with the 3 SHAPES done by a first grade special education student.


Feb 9, 2012

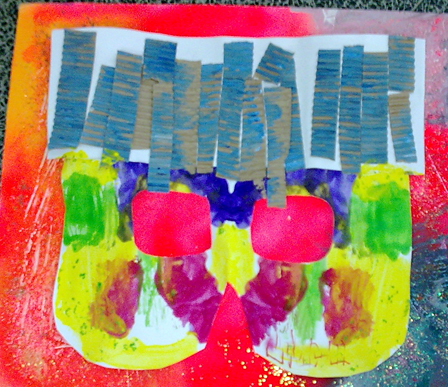
Colorful Masks

Next month we have our costume carnival holiday, Purim
 so here is a post from last year that was never published

No two are the same, easy to make carnival mask.
                                                                         link to another masks for Purim.
The bottom part of the mask is a print effect,
On a precut white cardboard that was folded in the middle, they painted with guache paint. Folding in the middle often to cause the print effect on the oppisit side.
It was put to dry.


The top eye mask is a colorful crep paper collage.
They first tore color crep paper, then the form snakes or round balls from the torn paper. They glued the crep paper on the precut construction paper with the cut out eyes.
The mask was put together once the parts were dry.


Nov 28, 2011

Plasticine Frame

A week after we made the ",circle with plasticine" we made this colorful mix media collage.

Each student choose a photo.

1. frame around the photo with plasticine,  using round shape balls technique.
 
2. tear strip of color paper and create a collage around the frame.
 
3. add a layer of glue on top of the plasticine frame.


Nov 12, 2011

Squill Plant sign of the Fall Season

The first sign of the Fall season is the sqill plant (chazav).
A tall plant that stands so high almost reaching the sky, that made me think of creating a blue background as the sky and creating a standing format.
I had this cardboard from wine bottle packaging.
They mixed blue and white for the sky, I intended that white clouds would be formed.

While the paint dried they formed small shape balls from riped white paper. 
They drew a line for the stem on all 3 parts of cardbourd and glued the white flowers to form the squill plant.

...let it dry and fold the cardboard to three.

see "mix media, squill flower" for another artproject of the squill plant .


Apr 8, 2011

Fish , Mix Media with Paper Plate


This was done in 2 session using paper plates. 
The first part was a COLOR BLUE collage, using torn blue paper, tissue paper, yarn etc...

The secend session: the Gold fish, embossed aluminum sheet that was precut in the shape of the fish, then designing the frame with paint and color sand.
We stapled the 2 plates together and  stringed the fish in the frame.

Dec 20, 2010

Snail, Winter Collage,

After the rain the snails come out and we had a big rainstorm last week.

  • For the background a collage with self torn tissue paper and trasparent paper  mixed with precut aluminium paper . Winter colors on black and .
  • While the collage dryed they designed there snail on trasparence sheet; using plasticine on the line drawing.
  • Then glued the trabsparent slide on the winter background and add a layer of glue on the plasticine.


Both stages of the project are very productive, and no matter what level they look good.
This technic was used in blue and white artproject,

Nov 4, 2010

Still Life, Black and White

This black and white drawing was introduced with this still life on the right.
They started with the object; either a cat or a vase on the table.
The cat is with the torn paper technique and vase used stickers and pastels. 

While the object dryed, they draw the table using black pastel only.
The gray was done by rubbing cooking oil with q-tip on the pastels lines.
On the drawing they added water down gauche, either red or yellow before gluing the object on or below the table.

Sep 12, 2010

Holiday Mobil

Another artproject for the holiday, 2 object mobil using tissue paper, torn white paper , pastels and a disposible degradable plate. 
Below is the combine photo of the mobile, front and back veiw of the same artproject.
After making snake shape pieces from tissue paper they choose either to design a pomegrant or a fish; after glueing the drawing to cardboard they glues the snake shape on photo copy line drawing.
While it dryed they tore white paper making small peices as feathers to cover the prcut recycle cardboard dove, glued the torn paper and added greetings.
The first object was cut and the reverse side was designed with color pastels.
To frame the object we used disposible degradeble plate that I precut the middle, we stapled the object to the plate.
The plate frame makes it easy to put together with a ribbon.


Jul 16, 2010

Colorful Pin Wheel

We are waiting for a summer breeze to watch them turn.
Made with 2 layer of artwork, glued together, then cut to form a pinwheel.
The outside as you see is torn crepe paper collage on cardboard page from an old calender.
The inside, is a pastel color drawing of target board.
I predraw a small circle as a start and 4 lines showing where to cut the drawing to form the pinwheel.
Once the collage was dry we glued the 2 artwork together back to back. With alot of help they cut and glued the corners in the small circle of the target.
Then then glued a cardboard circle in the middle.
The last part I did, I using a sharp tool made a hole.
Last part of the original post below is using rubberband,
my after thought, this is not a good  idea since it does not stand well in the sun. Just use a plan smooth rope .  
Before class I premade small matchstick and rubberband to use as turning pin.
Tied string through the rubberband from one pin to the next.


Jul 13, 2010

Window Color Artproject, mix media


We made this window art on a trasparence sheet; using plasticine to out line the drawing and torn color crepe paper and color sand to fill in the drawing.
Above both sides of the trasparence sheet.


They choose between a fish or a parrot.
One group did the torn paper inside the drawing and sprinkeled color sand all around the animal.
My second group started with the backround, using torn color paper to do the background and the inside was done with color sand.
I hope to display on the windows, and will post in the blog.

Jun 21, 2010

Complementary Colors - SUN

To complete the color wheel we did the Sun, using the complementary colors yellow and purple.

Step 1: rip purple color strips of paper and glue around the cardboard to pruduce a frame.
Step 2: with prerolled magazine and masking tape they created the sun rays.
Step 3: paint yellow on the sun rays and background.
Step 4: while the artwork is drying, they created the purple shell that you see on the sun. I precut shell and they glued color sand.


Jun 7, 2010

Complementary Colors, Summer

Inspired from the season's watermelon I started the Summer working on the complementary colors red and green.


I photocopied 4 summer illustration to work from; watermelon,wind surf,a hat or apples.
I prepared stripes of color green paper for the members to tire as the first step of this project. The red was precut ready to glue.


Around the summer theme they painted red and green.